> ## Documentation Index
> Fetch the complete documentation index at: https://docs.memorybox.ai/llms.txt
> Use this file to discover all available pages before exploring further.
# Quickstart
> Initialize the MemoryBox unified platform, execute your first document ingestion, and verify background runtime syncing.
Welcome to the **MemoryBox Beta**!
MemoryBox is a local-first personal AI that securely indexes your files, web workflows, and chat histories directly on your own device.
***
## High-Level Setup Checklist
Getting started takes less than 5 minutes. Here is the path to initializing your local workspace:
* **Step 1: Get Access** – Retrieve your beta invitation, or sign up for the waitlist.
* **Step 2: Install the App** – Set up the desktop companion app for your operating system.
* **Step 3: Install the Browser Extension** – Connect your browser workflows to sync logs locally.
* **Step 4: Initialize the Agent** – Run your first file ingestion in the workspace.
### Core Quickstart Video Walkthrough
Watch our master Beta Quickstart Guide to see a high-level overview of how to navigate the interface and utilize your local knowledge base.
***
## 1. Join the Beta
Access to MemoryBox is managed to ensure a stable and high-quality experience for our early users.
**Got an Invitation?**
Invitations are sent directly from the MemVerge team. Check your inbox for a secure email containing your unique access code and direct download links.
**Need an Invitation?**
If you don't have an invitation code yet, head over to [memorybox.ai](https://memorybox.ai) to join our waitlist and secure your spot in our rolling release phases.
**System Requirements Check**
Ensure your hardware meets the requirements for a local-first setup:
* **OS:** Windows 11; macOS 12.7.6+ (Monterey)
* **Memory:** Minimum 4 GB RAM (8 GB recommended).
* **Browsers:** Chrome (v88+) or Firefox (v109+).
* **Windows Dependency:** Requires **Microsoft Visual C++ Redistributable 2015-2022 (x64)**.
***
## 2. Install the MemoryBox App
The Desktop App acts as your secure local agent node, managing your localized vector database and hosting the underlying runtime. Select your operating system below to view the targeted setup video and instructions.
**Processor Compatibility:** MemoryBox supports both Apple Silicon (M1/M2/M3/M4) and Intel-based Macs for the Beta phase. Ensure you download the correct build variant for your architecture from your invitation link.
1. Download the unified Mac application package distribution volume (`.dmg`).
2. Open the disk image volume and drag the **MemoryBox** application binary directly into your system `/Applications` directory.
3. Launch the application from your Applications folder or system launcher.
4. When the macOS system dialogue asks if you are sure you want to open an app downloaded from the internet, click **Open** to complete initialization.
1. Download the Windows installer asset package (`.msi` or `.exe`).
2. Execute the installer package binary to initialize the installation wizard environment.
3. If intercepted by Windows Defender SmartScreen, click **More Info** followed by **Run Anyway** to bypass the untrusted publisher signature warning.
4. Complete the step-by-step setup wizard to install the local background runtime service.
***
## 3. Install the Browser Extension
The browser extension bridges your active web workflows, executing background synchronization of data logs directly to your local engine. Select your primary browser environment below:
1. Download the unpacked extension directory asset package from your initialization link.
2. Open a Chrome browser window and navigate to the extensions management console at `chrome://extensions`.
3. Toggle the **Developer mode** slider control to active in the top-right corner of the console.
4. Click the **Load unpacked** button in the secondary toolbar.
5. Select the root directory of the downloaded, extracted extension folder from your file system.
6. Pin the extension node to your browser toolbar to monitor real-time background sync states.
1. Download the extension package file (`.xpi`) from your initialization link.
2. Open the `.xpi` file in Firefox (or open the distribution link) and click **Add** to install the extension.
3. Confirm the extension is enabled via `about:addons` → **Extensions**.
4. Pin the extension to your browser toolbar to monitor real-time background sync states.
### Extension Verification
Once loaded, the default idle status node will display inside your configured browser toolbar:
 ***
## 4. First-Launch Initialization Agent
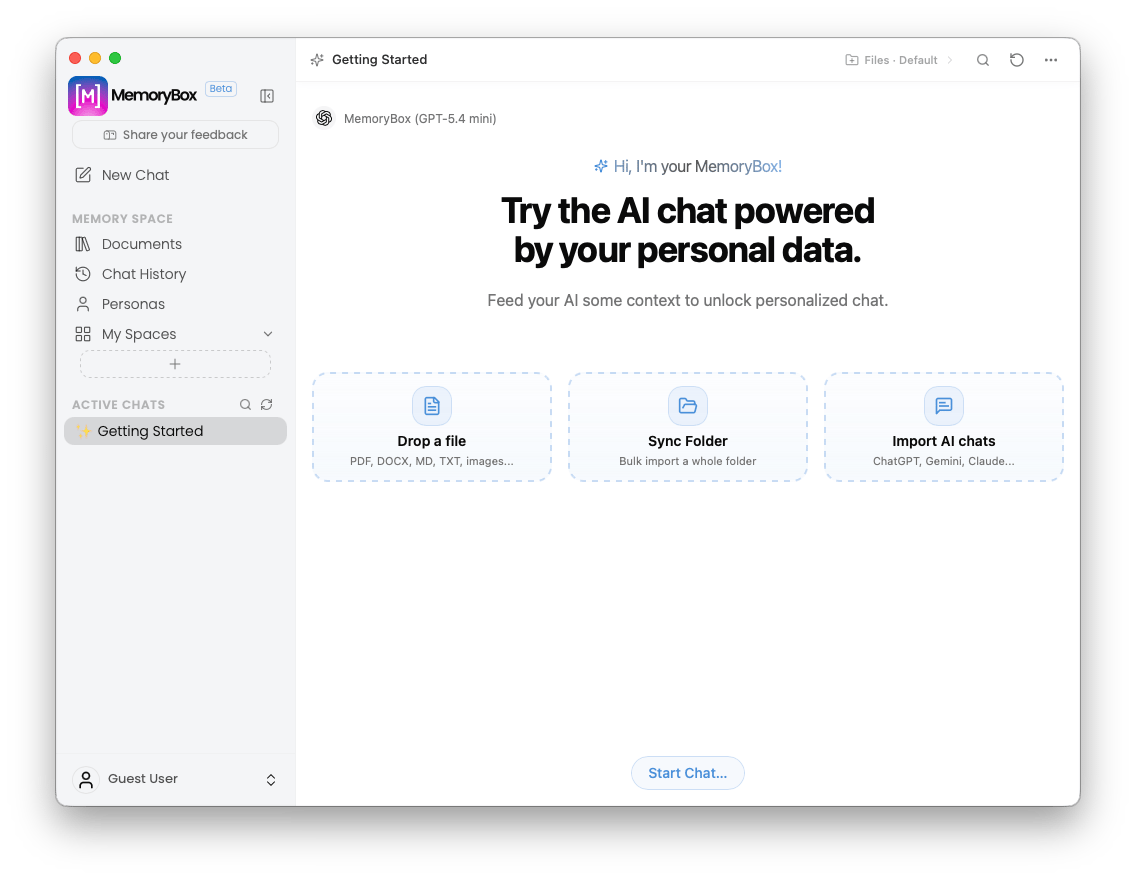
Upon your first secure login, the platform automatically initializes an interactive onboarding agent directly inside your execution workspace.
***
## 4. First-Launch Initialization Agent
Upon your first secure login, the platform automatically initializes an interactive onboarding agent directly inside your execution workspace.
 ### Step-by-Step Initialization Pipeline:
1. **Locate the Thread:** The interactive onboarding sequence automatically launches under **Active Chats** as the **✨ Getting Started** thread.
2. **Execute Ingestion:** Click one of the quick-start buttons on the dashboard interface (such as **"Drop a file"**, **"Sync Folder"**, or **"Import AI chats"**), or drag files directly into the active viewport.
3. **Automated Pipeline Processing:** The onboarding agent automatically routes ingested assets through the extractor pipeline, indexing them securely into your local knowledge base.
**Pro-Tip:** Once you have completed your initial onboarding sequence, you can safely hide the **Getting Started** chat from view by clicking the three horizontal dots next to its name under Active Chats and choosing **"Hide"**.
## What's Next?
With your core workspace initialized and your first assets ingested, proceed to configure your local file structural rules in the [Documents Guide](./phases/documents).
### Step-by-Step Initialization Pipeline:
1. **Locate the Thread:** The interactive onboarding sequence automatically launches under **Active Chats** as the **✨ Getting Started** thread.
2. **Execute Ingestion:** Click one of the quick-start buttons on the dashboard interface (such as **"Drop a file"**, **"Sync Folder"**, or **"Import AI chats"**), or drag files directly into the active viewport.
3. **Automated Pipeline Processing:** The onboarding agent automatically routes ingested assets through the extractor pipeline, indexing them securely into your local knowledge base.
**Pro-Tip:** Once you have completed your initial onboarding sequence, you can safely hide the **Getting Started** chat from view by clicking the three horizontal dots next to its name under Active Chats and choosing **"Hide"**.
## What's Next?
With your core workspace initialized and your first assets ingested, proceed to configure your local file structural rules in the [Documents Guide](./phases/documents).